

This is a follow-up to the previous post. Let’s get going.
The four remaining “red rooms” are in level 3. Let’s just deal with the first two rooms so we can view the set as a holistic whole.
The Deep Dwelling is the first room and will contain some variety of horrible undead ghouls that will sense your presence and start trying to grab and devour you as they shuffle slowly around. The player will have to weave very slowly around them. I intend for this room to be quite arbitrary in how vicious it is, because it’s the first room in the level and you’ll respawn back at the start if you die, and it’ll hopefully instil a healthy fear of what’s to come.
The second room, the Undercroft, is a chapel that serves as the level 3 clue room, and I can’t really add much here because I haven’t worked out what the clue objects are going to be. That should get filled in as we deal with the other rooms that are coming.
As to those rooms…
Level 3: The Chasm
The Chasm is very definitely based on this room.
This is one of those puzzles where the challenge doesn’t translate well to a text adventure – it’s a movement puzzle where the trick is remote-controlling your dungeoneer, with the added difficulty that they’re facing the opposite direction from the way they normally are (a sneaky trick by the producers). As such we’re going to use this room as an opportunity to build a little tension and also to hide the combination for the Causeway, a later room. Here’s a draft of what I’m attempting. Bear with the art.
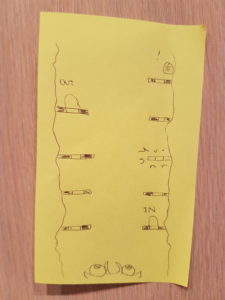
It’s nothing but the most professional design docs round here
The sequence goes like this: the player enters at the bottom right and exits via the door marked “out” at the top left. There’s two teleport pads at each level, other than the neutral centre tile you’re on. Stepping on a teleporter adjacent to the wall moves you up one level. Stepping on the one to the outside teleports you across the gap to the other platform on the same level.
There are two hazards here. After the “free” move (where you are safe either way), there is a broken platform on the door side. It will be quite obvious from visual cues when you are adjacent to it that it is damaged. If you teleport onto it, you can’t get back off.
The other hazard, as demonstrated by the angry lil’ face at the bottom, is the horrible beast that lives in the cavern. When it sees you teleport in, it will start climbing up the sides. It’s some distance below you so you have a head start. Every move you make, whether that be a horizontal or vertical teleport, gives it time to go up “one level”, height equivalent to one tier of platforms. If it catches up to you, you get eaten.
OK, so far, so sensible. The additional twist is that the platform in the top right clearly has something on it that you can see as you get closer. It is in fact a tablet with the combination to the Causeway, which is essential for getting across without plummeting to your death later on. The obvious problem is that by this point the beast is climbing ever closer and you’ll have had to make at least one horizontal transit, so you know that reaching the combination might be a red herring.
The design as displayed there does not work. You have to teleport up onto the exit platform from below, so you’re on the other side of the chasm. You will have to teleport across, up and then depending on how generous I am, either right (where there is no matching platform) or back down and across. This is either three or four extra moves from just leaving. (It will have to be three; at no other point do the teleporters let you go down, the wall-adjacent platform is always a climb up.) For the beast to be three moves down from you when you arrive at the exit platform, it will clearly be so far down the chasm that it’s obvious that you can easily make the teleport.
I think the best option is to elimate that extra top platform and have the causeway code directly across from you, taking two moves to obtain – one across, one back. Then have the beast be two layers below you with optimal movement when you reach the top. The creature will then catch up with you at the top layer as you teleport back across to safety, but in true Knightmare fashion you can jump through the door off the pad just as it moves to eat you.
This isn’t exactly complex game design and the solution may be obvious in practice but today’s thinking on this matter has reminded me that the whole purpose of this endeavour is to make something finished, and I can worry about something really good later on.
Level 3: The Lair
The Lair is here to evoke one particular rooms from early seasons of Knightmare. There were always big monsters that acted as major threats, even ones that could be talked their way out of – the wall monsters being the most obvious example – but they weren’t the only ones, and some were more physically dangerous than faces coming out of the wall. The Gargoyle was a giant sad head that would drain your energy if you didn’t cheer it up. There was a giant fanged skull on four enormous bone legs, a ghost scorpion, giant spiders, giant snakes, clockwork knights, cats with laser eyes (no, really), giant trolls, and a particularly cleverly-done wall monster that, due to having its memory wiped, didn’t actually know the answers to the questions it was asking, and as such it any confidently-delivered answer could bluff your way through.
This is not a particularly good format for some of the monsters – many of them slowly advanced towards the dungeoneer as their advisors desperately steered them towards the door, and I’ve tapped as much of that well as I think I can get away with in a non-action game in the Chasm.
There’s one particular monster encounter that stands out in the memory. After the initial shock value wore off he never did anything particularly impressive, but that initial shock was a good one.
The dungeoneer walked into a dark room with two doors, and they clearly had to step off from a ledge by the door into the body of the room, walk along a bit and then step onto another ledge to get to the exit door.

There is absolutely nothing suspicious about this at all.
Nothing too different from standard movement puzzles… except as they walked off the ledge a giant eye to the left of the screen opened, and then the lights came up to reveal:

Oh, fudge.
Enormous dragons are absolutely worth putting in the game.
So, the lair is the home of an enormous dragon. I don’t quite want to have the player walk on the dragon’s nose, but I do want to have it be something other than Answering More Questions. As such it’s going to be more along the lines of Smaug and Bilbo conversing. This is where I really properly practice building some dialogue trees.
So the player will walk into a dark room and accidentally wake up a dragon. They’ll know the dragon is there when a giant eye the size of a car opens and lights the room up. They can run at this point and escape and that will actually get them out. The benefit to not doing this is that successfully dealing with the beast is worth some magic that will make the final encounter significantly easier. On the other hand, it might well kill you.
Not wanting to overcomplicate this first effort, I want to stick to three basic sets of dialogue options if you want to engage with the dragon. This doesn’t count running away; if you attempt to flee at any point after the dragon has woken up properly, it will kill you and eat you. Beyond that it will tolerate your fumbling; it doesn’t get much conversation down here in the lowest level of the dungeon, but if you try its patience too far it will kill you and eat you. (Also you can theoretically attempt to use some of the clue objects on it but it won’t help, unless the clue object you brought is the Currently Unannounced Alternative To Dragon Mints, which will be an easy route to a good alternative later in the conversation.)
The core rule of how the conversation will flow is that getting out involves entertaining the dragon, not outwitting it. It knows you’re not meant to be there and are trying to sneak through to get to the Throne Room, but it is very bored living in a deep cave and only interacting with minions and cavernwights. Giving the dragon some amusement will result in survival and some dragon magic.
So, the approaches to take are as follows:
- Telling it the absolute 100% unvarnished truth. This is a novel strategy that the dragon will not expect – it knows you’re not supposed to be there but also expects you to try to bluff your way out. The route to success here is admitting that you are petrified of getting eaten and just hoping to escape, rather than trying to be clever at the end.
- Trying To Bluff Your Way Out type 1: “I am actually a minion of the Prince of Crows, I’m meant to be here.”
- Trying To Bluff Your Way Out type 2: “I am really really super lost, please direct me to the exit”
The second two approaches resolve in broadly similar ways. Allowing your story to spin out of control in what seems to be more ridiculous extremes will eventually cause the dragon to laugh and let you live, possibly providing you with some magic for your trouble (especially if you brought Not Dragon Mints). Insulting the dragon’s intelligence will bore it and it will kill you and eat you.
This is the most difficult room I have had to consider, in an attempt to make it interesting and different from previous encounters, and I’m still not sure exactly how it’s going to work until I actually build and playtest it. I think this is one I’m going to shake out in post, but I just started out with “I want to have a giant dragon on the final level” and it took a long time to work out what it was actually for.
There are two rooms left to go but I’m going to publish this post, as it’s taken long enough to get this one out.