

Time for some work, I suppose.
You will note a subtle change in the map from the last post:
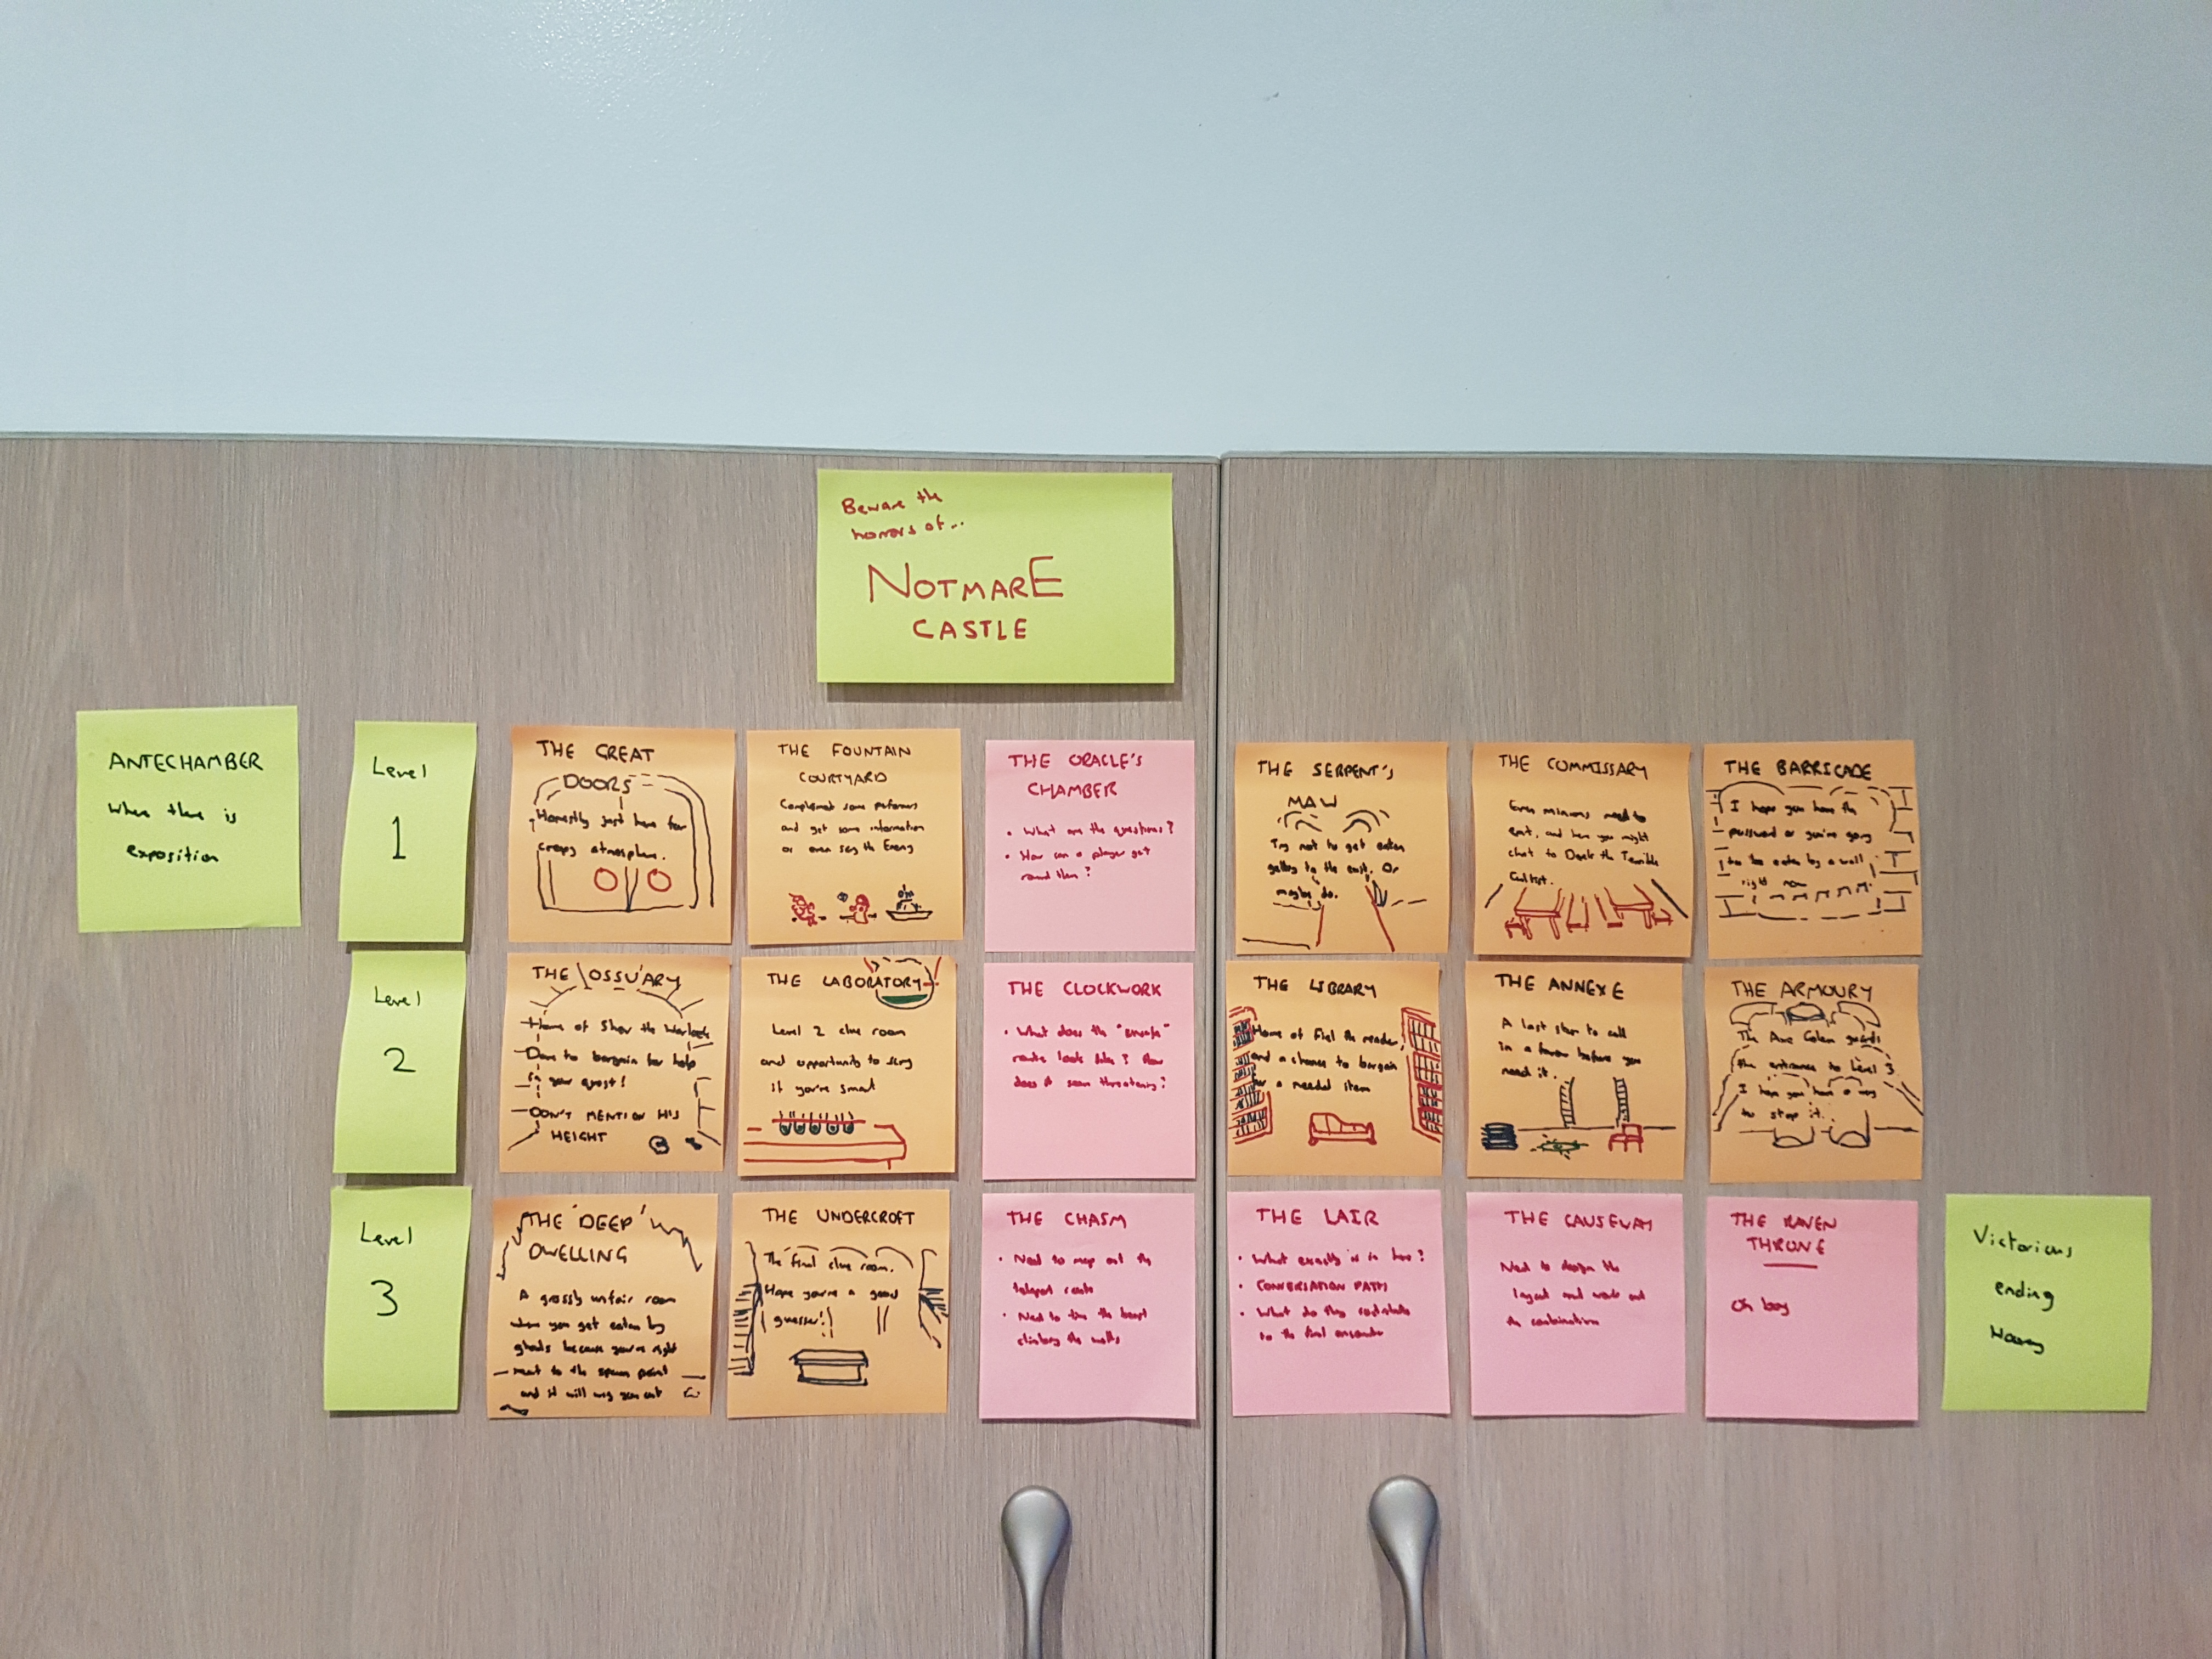
Damage Report! (click for full size)
Having done some work on what should be in individual rooms, I’ve worked out that some of those rooms are significantly more difficult than others. While they may contain fairly lengthy conversations (such as with the warlock in the Ossuary in level 2), the contents of those conversations are fairly straightforward and just require a little rough drafting to make sure that everything inside flows properly. (The warlock, for example, is just a straight “Will you help me get this item in exchange for some magic?” with some extra options for getting some character detail, and making jokes about his height so he can unceremoniously kill you.)
There are other rooms that don’t have easy answers, or at least have a lot of answers that I am yet to work out. I’ve swapped these out for the hot pink and red danger warnings you can see in the chart. As you can see there’s a certain, um, imbalance in distribution; one each in levels 1 and 2, and four out of the six rooms in level 3. (Although having the more complex rooms in the run-up to the final challenge is not exactly a problem with the difficulty curve.)
I’m going to have to work out those problems at some point, and this seems like exactly what this blog is for, you gormless chump a good place to do it. Let’s work through some in order.
Level 1 – The Oracle’s Chamber
The Oracle’s Chamber is what Knightmare parlance refers to as a “clue room”. A selection of objects is available that will be of further use in later in the dungeon – usually three, and the dungeoneer is only allowed to take two. There will be some form of hint as to what you should take, whether that be information gained from NPCs, scrolls, spying on the enemy or – in earlier seasons – the Wall Monster.
The problem is accessibility. The writers of Knightmare had a definite player demographic they would pitch their questions at, and when you’re writing a game that you hope will have a more universal appeal you need to be careful about those assumptions. While most British children get taught about kings and queens, and learn about some of the big aspects of Arthurian legend through cultural osmosis even if they never get set extracts from Le Morte d’Arthur at school, I’m not entirely certain how well that cultural osmosis applies in Turkey or Bahrain*. Walling off information required to complete the level behind questions your players couldn’t know the answers to without Googling is not necessarily good design, especially if that blockage is three rooms into the game.
Having given this matter due consideration, however, I am less worried about it than I was when I was making my list of red rooms earlier in the week. Here’s how it breaks down:
- The three clue objects in the Oracle’s Chamber are a dagger, a bar of gold and a chilli pepper.
- The “correct” items to take are the gold and the chilli pepper. The gold will allow you to bribe Derek the Terrible Cultist** in the Commissary so that he gives you the password to get past the living wall at the end of the level. The chilli pepper will allow you to escape being eaten by the stone snake in the Serpent’s Maw if you allow it to swallow you.
- In the antechamber, the Castellan will remark before you start the game that force of arms is unlikely to win you the day. This is already a disincentive to take the dagger.
- The chilli pepper is not a requirement to pass the Serpent’s Maw, only a get-out if you don’t take the risk of making the dangerous jump onto the exit path. The gold is the only mandatory item, and there’s a 2/3 chance you’ll take it. It’s also the most inherently useful item if you were just looking at an empty table.
- In the previous room, the Fountain Courtyard, you will have spoken to two NPCs. If you are polite to them, Eadric the bard will tell you the Oracle’s true name, which allows you to command it and get the clues without having to answer any questions and risk getting eaten. Blinks the wizard will also let you scry on Derek the Terrible Cultist having a conversation with the Prince of Crows (the master villain) in which he complains about being broke, letting the player know in advance he’d be vulnerable to a bribe, which hopefully lets them put two and two together when they see the gold.
- Using information from the NPCs to bypass the potentially dangerous Oracle encounter is actually the preferred result of these rooms – the goal is to show the player early on that negotiating with NPCs is the best way to deal with problems, which will help them pass the trading sequence in level 2.
- Setting aside that entirely, by the inherent nature of the game being hypertext rather than parser-based, the Oracle’s questions will have to be multiple choice, which usually gives players a much better prompt to their memory of what the answer is.
So on that basis, there are plenty of mechanics to allow players to make the right item choices without worrying about the Oracle, and I can set poetic-sounding questions about Greek mythology as much as I like (as long as it’s the kind of thing that shows up in Hercules) whilst knowing that I won’t completely block players off. Great, that’s a room done. Next!
Level 2 – The Clockwork
The appearance of a room of moving cogwheels that the player has to walk across, in this context, is a reference to a specific puzzle in Knightmare called the Mills of Doom, which really was no different to any room with holes in the floor – the dungeoneer didn’t rotate along with the cogs (that would likely have been both a logistical and health and safety nightmare in the studio) so it was just a matter of them not stepping off the side. The inclusion of a relatively unmemorable element here is largely down to the fact that “terrifying levels where you climb the inside of a giant clock” are an excellent video game staple, even if you just count Castlevania, although my own personal childhood clockwork hell is from Castle of Illusion on the Sega 8-bits, which may be a bit overly specific.

This is not the most obscure video game I will ever reference here but it’s certainly a contender
The room needs a little context. Level 2 ends with the Axe Golem, which will straight-up kill the player if they don’t have an appropriate spell. The way to gain this spell is to trade with Shev the Warlock, who makes a bargain with the player for a Golden Orb. The Golden Orb is in the possession of Fiel the Librarian, who will swap it for a book that can be obtained from the level 2 clue room, the Laboratory.
In the Laboratory is Blinks the mage, previously seen in the Fountain Courtyard. She will offer the player another chance to scry on the enemy. The catch is that this time she wants one of the clue objects from the table, and giving one to her will count (by the rules) as one of the player’s selection. She makes this trade clear to the player. (The sequence will be such that the player can opt to stiff her on the deal by taking two objects and attempting to leave the room without giving Blinks the wand she wants – if they do this, Blinks will pyroblast them to ash before they leave for being so rude.) Scrying on the enemy will see the Prince of Crows conversing with Fiel the Librarian, where she indicates that she is not on the side of the Enemy and anyway is far too busy to deal with that kind of thing, she’s reading.
The clue objects are the wand, a key and a book. The book is nothing special when looking at it, just the middle chapter of a dull-sounding adventure series, rather than anything magical. The catch is that the librarian is partway through the series and will happily trade the Golden Orb she has on her desk for the book because she left off at a cliffhanger. That’s the essential object for clearing the floor, as it’s needed for the trading sequence to get the spell that defeats the Axe Golem and allows access to level 3. The player’s instincts are likely to be that the wand and the key both look useful (although suspicious types are likely to take the book because it’s innocuous.)
The first thing the player will see as they enter the Clockwork is a keyhole clearly labelled as the emergency stop. Inserting the key and using it will shut down a section of the cogs, allowing the player to walk across unhindered. Without the key, the player is forced to jump from moving cog to moving cog.
The key is a trick.
There is no chance of the player actually falling off the cogs when they jump. If it was an action game that might go in, but it’s a (hyper)text adventure. The key is a red herring. The optimal solution is to take the book to trade and swap the wand with Blinks to do the scrying. The key is basically just meanness to worry the player that they’ve made the wrong item choice and to see if they will attempt to find some way to get both the key and the book on repeat attempts of the level.
The reason this room went on the red room list is because I realised I’d have to map out a jumping puzzle should the player elect to try to jump across the cogs. If you’ve kept up, however, you’ll have reached the same conclusions I did. They are as follows:
- The jumping puzzle doesn’t matter.
- Seriously, they can’t die.
- All it has to do is look tricky. The whole sequence is a sneaky cheat. Maybe they should have some options to fall off if they are deliberately stupid but they won’t get killed if they make a good effort.
The only problem with the sequence that I identified working through this whole process is that it’s entirely possible to miss out that the key is useful if you pick the right objects the first time round. The “red herring” is only effective in that the player will see the opportunity to use the key and think “Oh, did I need that?” and then finish the level anyway. A quick solution is for the Prince of Crows to make reference to the Clockwork key in his conversation with the Librarian should the player scry. That way the player is left with the impression that the “correct” objects are the wand to pay Blinks for the scrying, and the key… or is it the book? The Librarian likes books, after all. The Prince should specifically say it would be difficult to cross the Clockwork without the key, not that the Librarian (and accordingly the player) needs it. (A thought occurs that the Librarian should say she lost her key while visiting the Ossuary – a smart player may guess the book is also hers.)
As such the Clockwork is best solved with good writing – a complex series of jumps through grinding machinery where the player has to pick a route across the cogs, but one where they’re never actually in danger of picking the wrong option.
Shit, this whole section is a massive spoiler if you ever intend to play the final game. Oh well, never mind!
I’ll deal with the sequence of four red rooms in level 3 all in one block next time.
* To the specific people from Turkey and Bahrain who are reading this and realised I probably meant them – hello!
** Name to be improved later. I hope.
Pingback: Whoops – VERTICAL BLANKING